

Sharing information through emails has become so easy now. People find it too easy to use email for sharing information. Every type of information can be shared by people. But sometimes people do not want to keep all emails for permanent storage or share their content with others. This is because some information is too important, which requires extra protection. Additionally, extra privacy becomes necessary when users send sensitive information such as passwords, documents, and their personal details. Therefore, Gmail Confidential Mode provides essential security functions. In this blog we will show complete steps to use Gmail’s Confidential Mode through a simple and clear method. So, let’s get into it.
What Is Gmail Confidential Mode?
Gmail’s Confidential Mode enables users to protect their email communications. This feature enables users to determine access rights for their messages. It enables users to protect their confidential information. It also enables users to set an expiration date for their emails. Furthermore, it allows users to require users to enter a passcode before they can access your message. This mode stops users from sending, duplicating, or downloading content. Lastly, it protects your confidential data through enhanced security measures.
Steps to Use Gmail’s Confidential Mode
The following steps will help you in using Gmail’s confidential mode.
Step 1: Open Gmail and Compose an Email
- Firstly, start with opening your Gmail account.
- Click on “Compose” to create a new email.
- Write your message in your usual way.
- The recipient’s email address and subject line should be added.
Step 2: Turn On Confidential Mode
- Secondly, when you write an Email, you will find a lock icon with a clock at the bottom of the compose window.
- When you select that icon, the Confidential Mode feature will be activated.
- After activating this icon, the email settings will be displayed in a new window.
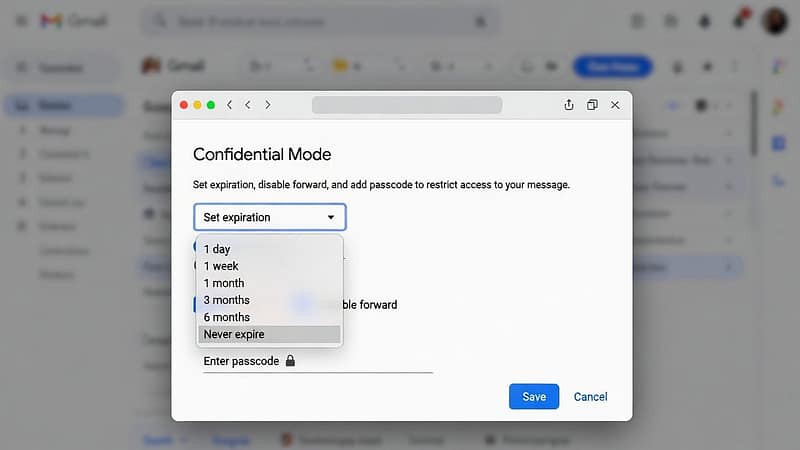
Step 3: Set Expiration Date
- Thirdly, choose the duration for which your email will remain available.
- The available options include the following time periods:
- 1 day
- 1 week
- 1 month
- 3 months.
- After the selected time, the email will expire and cannot be opened.
Step 4: Add Passcode Protection
- This Gmail system allows users to use a passcode as an additional security measure.
- It provides two different choices.
- The first option allows users to access their accounts without entering a passcode.
- while the second option requires users to enter a passcode through their text messages to access their accounts.
- The SMS passcode option sends the recipient a code, which they need to use to access their email.
Step 5: Send the Email
- After setting confidential mode, users should click “Save” before you send your email.
- The current message will be secured according to the chosen security settings.
How to Remove Access?
Confidential Mode enables users to control access rights to their documents at any time. The process requires you to follow these steps.
- Open the email that you already sent.
- easy to
- The recipient will be prevented from accessing the message content through this action.
Conclusion
In conclusion, learning how to use Gmail’s Confidential Mode is very beneficial. It enables users to protect their personal information and manage their email sharing practices. Additionally, users can send emails securely to anyone. It is because this gmail system provides expiration dates and passcode protection features. Confidential Mode offers users a secure email solution. Therefore, if you also want to protect your confidential emails, start using this mode now.